基于HA-DPO和LLaVA的代码库进行训练和测试
对 github repo 的理解
MODEL_ZOO: 包含了各种预训练的机器学习模型的权重和配置
Demo: 可使用图形界面或命令行进行推理, 测试模型效果
Gradio Web UI: 基于 Gradio 库构建的Web用户界面
- controller: 控制器, 管理 Gradio 应用程序的状态和行为. 接收用户请求, 处理用户输入, 调用响应函数执行请求的操作
- Web Server: Web 服务器, 接收用户的 HTTP 请求并传递给控制器
- Gradio Web Server: Gradio Web 服务器, 与 Web 服务器相似, 专门用于托管 Gradio Web 应用程序. 通过调用 Gradio 库中的函数来启动 Web 服务器
- SGLang Worker: SGLang 工作器, 用于定义模型和界面间通信的语言
- Model Worker: 模型工作器, 是一个独立的进程或线程,负责加载、运行和管理模型, 启动模型工作器后可以接收输入并产生输出
CLI Inference: CLI Inference是指通过命令行界面 (CLI)进行推断 (Inference) 的过程
legacy model: 旧有的模型
linux 和 vscode 的使用
linux 常用命令
cd, ls
cd ~: 进入 home 目录
pwd: 查看当前目录
echo $PATH: 查看当前环境配置
du -ah: 显示文件夹内文件及其子文件夹的大小
df -h: 查看磁盘使用情况
ps -ef: 显示当前运行的所有进程
nvidia-smi: 显示当前时刻 GPU 使用情况
nvitop: 实时显示 GPU 使用情况 (服务器未安装)
top: CPU 实时使用情况, 按 I 显示每个进程占用总资源的百分比
kill PID: 杀死进程
ls -l file name: 查看上次文件的修改日期和修改人
vscode 的使用
-
在服务器上安装 python extension 后, 使用
ctrl + left mouse可以跳转至变量/函数上一次使用处或定义处 -
快速预览
ctrl + shift + v
3.md 快速链接文档内位置, 使用 语法解读](#train_dpopy-语法解读), 加粗和 “.” 直接忽略, 空格用 “-” 代替, 任意级标题均用一个 #
-
安装 vscode-fileheader 插件, 使用
Ctrl + Alt + I在文件头部加入作者和日期信息 -
安装 nvitop 命令,
pip install nvitop
hadpo-conda环境搭建
参考环境配置完成conda环境搭建与配置, 使用以下代码使用环境
1 | conda activate hadpo |
git版本管理
step1. vscode 安装 git 相关插件
step2. 用户登录 github 账号
- 用户账号的主目录下生成 ssh 密钥对
1 | ssh-keygen -t rsa -b 4096 -C "your_email@example.com" |
打开生成的公钥文件, 它的默认位置是 ~/.ssh/id_rsa.pub, 复制公钥内容. 然后登录 GitHub, 转到 “Settings” -> “SSH and GPG keys” -> “New SSH key”, 将公钥粘贴到 “Key” 文本框中, 然后点击 “Add SSH key”
- 在项目文件夹路径下登录账号 (note: 这里没有使用–global, 使用的后果未知)
1 | git config --global user.name "Your Name" |
确保将 /home/user1/.ssh/id_rsa 替换为你生成的私钥的路径
- 尝试连接github
1 | ssh -T git@github.com |
确认连接后, 会提示 “You’ve successfully authenticated”, 表示登陆成功
step3. 将服务器仓库与远程仓库关联
1 | git remote add origin https://github.com/421zuoduan/Deep-Learning-for-MLLMs.git |
如果已经与远程仓库关联, 使用以下指令查看当前关联的远程仓库
1 | git remote -v |
与原有远程仓库删除关联
1 | git remote remove origin |
此时再执行前述关联新仓库的指令
step4. 设置.gitignore
.gitignore 文件用以设置哪些文件夹和文件不需要上传, 具体格式详见该文件
step4. git push
创建测试环境分支 dev, 并在服务器上切换为该分支
1 | git checkout -b dev |
由于本地是 git clone 自HA-DPO仓库并进行了修改, 这里不进行 git pull 操作, 强制 push
1 | git add . |
push 过程中经常出现网络连接问题, 尝试使用以下代码取消代理. 如果依然出现 fatal 报错, 等一会再push
1 | git config --global --unset http.proxy |
经常出现的报错有:
1 | fatal: unable to access 'https://github.com/user/project.git/': GnuTLS recv error (-110): The TLS connection was non-properly terminated. |
或
1 | fatal: unable to access 'https://github.com/user/project.git/': Failed to connect to github.com port 443 after 131081 ms: Connection timed out |
step5. commit 的撤销与删除
commit时如果发现有时间过长或大文件没有gitignore, 可以使用插件Git Graph撤销commit
| 是否删除对代码的修改 | 是否删除commit记录 | 是否新增commit记录 | |
|---|---|---|---|
| Undo Commit | 不会 | 未Push会, 已Push不会 | 不会 |
| Revert Commit | 会 | 不会 | 会 |
| Drop Commit | 会 | 未Push会, 已Push不会 | 不会 |
按下Ctrl + Shift + P, 然后搜索Git: Undo Last Commit, 即可撤销上一次的commit
step6. 大文件 push 后无法解决之究极方法–删除 repo 和 .git 文件
-
删repo
-
打开vscode的
File-Preferences-Setting, 搜索Exclude, 删除**/.git, 即可显示.git文件夹, 删除 .git -
从用户登录处重新操作
数据集与代码准备
数据集路径
TODO: 将 hadpo 的路径改为 post decoder
HA-DPO 的代码框架没有将 llava 原始的 trainer 加入进来, 所以我手动增加了数据
HA-DPO
HA-DPO 的数据集在 ha_dpo/data, 代码 ha_dpo/models/llava-v1_5/train_dpo_post.py, trainer ha_dpo/trainer/llava_dpo_trainer_post.py
Llava
TODO: 后续将 playground 数据集改过来
Llava 数据集在 /home/cuiruochen/LLaVA/playground/data, 代码 ha_dpo/models/llava-v1_5/train_llava_post.py, trainer ha_dpo/trainer/llava_trainer.py
数据集准备
HA-DPO
依照 data preparation 进行数据集和测试集的准备
数据集结构如下
1 | ha_dpo/data |
Llava
根据 官方文档 准备数据集
注意 ocr_vqa 文件夹是 OCR_VQA_200K 数据集, 论文提供的下载方式是脚本, 需要手动运行给出的 python 文件来下载数据集. 这个数据集含有 .jpg 和 .gif, 根据 issue, 可以将所有 .gif 文件改后缀为 .jpg. /home/cuiruochen/LLaVA/playground/data/ocr_vqa 路径下的 check_prefix.py 和 revise_gif_to_jpg.py 文件可用于检查和修改后缀 (自己写的)
1 | ├── coco |
LLaVA-1.5训练
源码更新
更新 Evaluation 代码
由于部分 Evaluation 代码已经更新, 需要手动下载 eval.zip 放到 ha_dpo/models/llava-v1_5/playground/data/eval 路径, 压缩包内的十一个文件夹用作不同测试集.
更新POPE代码
根据 LLaVA-issue-626, repo 内 POPE的教程 是对POPE旧版本的指导, 但是代码内已经修改为新版本. LLavA在 Scripts教程 内给出 eval.zip, 压缩包内含有新版POPE的评估代码与测试集. 按照此处更新测试集和代码即可.
deepspeed 指令解读与更新
DeepSpeed 库介绍
pytorch, tensorflow, keras 等框架在面向大规模模型编程时不是很方便. 以 pytorch 为例, pytorch 的分布式并行计算框架 (Distributed Data Parallel, 简称 DDP), 仅能使数据并行, 即模型大于显卡显存时, 除非将模型参数拆开到各个 GPU 上, 否则无法使用.
DeepSpeed 是微软开源的框架, 能实现拆散功能, 将模型参数拆散到各个 GPU 上, 实现大模型的计算, 使我们用更少的 GPU 训练更大的模型而不受限于显存. 但是 DeepSpeed 的文档写的不好 (我证明! 沟槽的文档). 载入模型和编写模型的代码基本相同, DeepSpeed 通过输入参数来启动训练, 使用argparse解析参数
hadpo 的 deepspeed 指令解读
根据文档给出的下述训练指令, 找到 ha_dpo/models/llava-v1_5/train_dpo.py.
1 | deepspeed ha_dpo/models/llava-v1_5/train_dpo.py \ |
deepspeed 指令后的参数与 train_dpo.py 中的 ScriptArguments, DataArguments, ModelArguments 有关, 这里我摘取部分重要参数作解释:
1. script
- lora_enable: 是否使用 lora 进行训练
- deepspeed: deepspeed configuration path
- bf16: default=False, bf16 是对 fp32 单精度浮点数截断数据. 8bit 表示指数,7bit 表示小数
- fp16: default=False, 是否使用 fp16 权重, 5bit 表示指数,10bit 表示小数. fp16 是半精度浮点数, fp32 是单精度浮点数. fp16 计算更快但精准度更低
- output_dir: 训练 checkpoint 保存路径
- num_train_epochs: 训练 epoch 次数
- per_device_train_batch_size: 每个 device 训练的 batch
- per_device_eval_batch_size: 每个 device 测试的 batch
- gradient_accumulation_steps: default=4, 梯度累积的steps, 每 N 个batch更新一次参数, 实现类似于相同显存扩大 batch_size 的效果. 这是一种时间换空间的处理方法. 参考博客
- evaluation_strategy: default=no, 训练期间采用的评估策略, 可选 ‘no’, ‘steps’, ‘epoch’
- save_strategy: 保存策略, default=steps
- save_steps: 保存参数的频率, default=-1
- save_total_limit: default=1, 被保存的模型的参数的数量
- learning_rate: 学习率
- weight_decay: 指定权重衰减的值, 应用在 AdamW 优化器的除了偏置 (bias) 和 Layer Normalization 层 (LayerNorm) 的所有层权重上. 权重衰减是一种正则化手段, 通过向损失函数添加一个额外的项来惩罚较大的权重值, 有助于防止模型过拟合训练数据
- warmup_steps: 指定线性热身的步骤数, 这个参数会覆盖warmup_ratio, 如果设置了 warmup_steps, 将会忽略 warmup_ratio. 开始训练时以很小的学习率进行训练,使得网络熟悉数据. 参考博客
- lr_scheduler_type: 学习率优化器的种类
- logging_steps: 记录日志的频率
- tf32: 是否使用 tf32
- model_max_length: 句子的最大长度, 少pad多截断
- gradient_checkpointing: 是否使用梯度保存点. 博客, 不保存中间节点的梯度, 在反向传播时重新计算这部分节点的梯度, 是一种用时间换空间的方法.
- dataloader_num_workers: dataloader 的 worker 进程数量, 经验设置值是自己电脑/服务器的CPU核心数. worker 用来将 batch 取到 RAM 中, 数量为0时 RAM 直接找和取 batch. 博客
- report_to: default=wandb, 用于指定要将训练结果和日志报告到的不同日志集成平台
- run_name: 跑的模型的名字, 这里要改成自己命名的模型
- beta: DPO loss的 beta 值
2. model
- model_name_or_path: 模型名称/路径, 指向参数文件路径
- version: default=v0, 代码内仅区分v0, v5与其他
- vision_tower: 属于 linear 层, 在 HA-DPO 代码中要训练
- mm_projector_type: projector default linear, llava 里使用 mlp
- mm_vision_select_layer: default=-1 for the last layer, 作用是取 CLIP 的 ViT 直到倒数第二层
- mm_use_im_start_end: instruction tune 时设置为 False, TODO
- mm_use_im_patch_token: instruction tune 时设置为 False
3. data
- vg_path: VG数据集路径
- desc_data_path: desc_data.json 文件路径
- pope_data_path: pope_data.json 文件路径
- image_aspect_ratio: default=square, his pads the non-square images to square, instead of cropping them; it slightly reduces hallucination
- group_by_modality_length: default=False, this should only be used when your instruction tuning dataset contains both language (e.g. ShareGPT) and multimodal (e.g. LLaVA-Instruct). It makes the training sampler only sample a single modality (either image or language) during training, which we observe to speed up training by ~25%, and does not affect the final outcome.
- lazy_preprocess: TODO
hadpo 的 deepspeed 指令更新 (dev)
官方 不建议使用 CUDA_VISIBLE_DEVICES=1 python -m, 建议在 deepspeed 阶段使用 deepspeed --include localhost:1 来指定显卡
需要注意的是, HA-DPO 和 LLaVA 都有使用 lora 训练的教程, 但是没有什么微调 head 的教程, 我的实验需要在 backbone 和 head 间加入模块训练. 所以我们作出以下调整:
stage 1
- lora_enable = False
- freeze_backbone True
- tune_mm_mlp_adapter False
- tune_post_decoder True
- tune_lm_head False
stage 2
- lora_enable = False
- freeze_backbone True
- tune_mm_mlp_adapter False
- tune_post_decoder True
- tune_lm_head True
代码解读
model 文件夹结构
ha_dpo/models/llava-v1_5/llava/model 路径下, 可以看到有 language_model, multimodal_encoder, multimodal_projector 三个文件夹. 经检查, ‘language_model’ 通过继承 llava_arch.py 中的类, 调用了 multimodal_encoder 和 multimodal_encoder 的方法.
检查发现, 与 train_dpo.py 在 ha_dpo/models/llava-v1_5/llava/train/train.py (也即 llava 训练源码) 基础上完成, 前者引用了后者的一部分方法
language_model 文件夹
llava_llama.py 中含有 llava 代码与 head 代码. LlavaLlamaForCausalLM 类是 llava, 类中 self.lm_head 是 head, head 被定义为一个无偏 linear
文件夹下 mpt/ 和llava_mpt.py 是使用 MPT 作为 LLM 进行微调的代码, 这里我们不需要使用
multimodal_encoder 文件夹
内有 builder.py 和 clip_encoder.py 两个文件. 使用前者的 build_vision_tower 建立 vision encoder 的模型. 后者只包括 CLIPVisionTower 类
CLIPVisionTower 类内包括:
- init 初始化方法
- load_model 加载模型方法 (使用 .from_pretrained)
- feature_select 方法
- forward 方法得到 vision encoder 的输出
clip_encoder.py 解读
multimodal_projector 文件夹
内有 builder.py 一个文件. 包括 IdentityMap, SimpleResBlock 两个类和 build_vision_projector 一个方法. 返回一个 Sequential
llava_arch.py
该文件在 model 文件夹中, 定义的 LlavaMetaModel 和 LlavaMetaForCausalLM 被 llava_llama.py 作为父类被引用
LlavaMetaModel 类
__init__: 使用 build_vision_tower 定义 self.vision_tower, 使用build_vision_projector 定义 self.mm_projectorget_vision_tower: 从 config 中得到 vision_tower 的值initialize_vision_modules: 定义 vision_tower 和 mm_projector, 加载相关参数
LlvaMeta_ForCausalLM 类
继承自 ABC 类, 使用了 @abstractmethod 装饰器, 可以参考 语法解读
get_model: 空方法, 要子类给出get_vision_tower: 利用 get_model 和 get_vision_tower 方法得到 vision_towerencode_images: 将 vision_tower 和 mm_projector 分别作为 images 和 image_features 编码至 image_features 并输出prepare_inputs_labels_for_multimodal: 很复杂的函数, 没有为 ha-dpo 作特别修改 (TODO: 应该?). 最终输出新的 labelinitialize_vision_tokenizer: 与 deepspeed 设置中 mm_use_im_patch_token 和 mm_use_im_start_end 参数有关, 其值为 True 时发挥作用, 没细读
builder.py
只有 load_pretrained_model 一个函数, 在 model_vqa.py, pope_eval.py 中被调用, 在 Evaluation 过程中使用
-
以特定 bit 加载模型
-
如果 model_name 中有 ‘llava’, 加载 llava 模型; 否则加载AutoModelForCausalLM 类.
-
加载 llava, 如果名字中有 ‘lora’ 且未提供 model_base 参数, warning 要提供 model_base 参数; 若提供了则从 model_base 中加载 llava, 这里加载 LlavaLlamaForCausalLM 类. 然后加载 llava 模型中额外的参数, 若有则加载 non_lora_trainables.bin 文件, 否则从 huggingface 加载文件.
-
加载 llava, 如果名字中没有 lora, 提供 model_base 参数, 从 llava 中加载参数; 若有 mpt 参数, 加载 LlavaMPTForCausalLM 类, 否则加载 LlavaLlamaForCausalLM 类; 再加载 mm_projector 参数. 若没有提供 model_base 参数, 重复上述操作, 但是不加载 mm_projector
-
不加载 llava, 若提供 model_base 参数, 加载 AutoModelForCausalLM 类, 加载 lora 参数; 否则重复上述操作, 但是不加载 lora 参数
-
-
若使用 llava, 加载 vision_tower
-
返回 tokenizer, model, image_processor, context_len
train_dpo.py
train_dpo.py 语法解读
deepspeed 库的代码偏向工程, 这里写一些 Python 里的用法
-
os.environ的使用os.environ是一个环境变量的字典. 使用以下代码创建自己的环境变量:1
os.environ["WANDB_PROJECT"]="ha-dpo"
-
local_rank指定使用哪个 GPU -
@dataclass修饰器本质是装饰器, 可以给函数动态地增加功能. 以下是 dataclass 装饰器带来的变化:
-
无需定义__init__, 将值赋给self,dataclass负责处理它
-
以更加易读的方式预先定义了成员属性和类型提示. 例如, 能轻松知道 val 是 int 类型
-
-
*args和**kwargs的用法参考博客, 详见博客
*args 表示任何多个无名参数, 本质是一个 tuple
**kwargs 表示关键字参数, 本质是一个 dict
同时使用时必须要求 *args 参数列要在 **kwargs 前面 (因为位置参数在关键字参数的前面)
-
@property的用法把一个方法变成属性. 可以让调用者写出简短的代码,同时保证对参数进行必要的检查
-
__len__魔法方法加入
def __len__(self)方法后, 可以直接使用len(class_name)来获取一个字符串/列表/…的长度, 返回值取决于该方法的返回值 -
__getitem__魔法方法def __getitem__(self, key)方法返回所给键对应的值 (当成列表用) -
isinstance()函数isinstance(a, str). 如果 a 是 str, 返回 True, 例如 a=2 则返回 False
-
__call__方法为了将一个类实例当做函数调用, 我们需要在类中实现
__call__()方法. 也就是要在类中实现如下方法:def __call__(self, *args). 这个方法接受一定数量的变量作为输入 -
ABC 抽象类ABC 是 abc 模块中的一个类,用于定义抽象基类 (Abstract Base Class). ABC 是 abc 模块的一个核心类, 它是所有抽象基类的基类. 抽象基类是一种特殊的类, 它只包含抽象方法和抽象属性的定义, 而没有具体的实现. 抽象基类主要用于定义接口和约束子类的行为, 而不是提供具体的实现. 通过抽象基类, 可以强制子类实现特定的方法和属性, 从而确保子类的一致性和兼容性.
要定义一个抽象基类, 可以继承 ABC 类, 并使用 @abstractmethod 装饰器声明抽象方法. 子类必须实现抽象基类中的所有抽象方法, 否则在实例化子类时会引发 TypeError 异常
-
@abstractmethod@abstractmethod是 Python 中的一个装饰器, 用于声明抽象方法. 抽象方法是一个在抽象类中定义的方法, 它只有方法签名而没有具体实现. 在 Python 中, 抽象方法是通过 abc 模块中的 ABC 基类和 abstractmethod 装饰器来定义的. 使用@abstractmethod装饰器修饰的方法必须在包含该装饰器的类的子类中进行实现. 如果子类没有实现被装饰的方法, 那么在实例化子类时会抛出 TypeError 异常
train_dpo.py 代码解读
如有必要, 请读源码
-
ModelArguments,DataArguments,ScriptArguments三个类用来接受 deepspeed 指令的参数 -
LazySupervisedDataset类用以 supervised fine-tuning -
DataCollatorForSupervisedDataset类为 supervised fine-tuning 提供示例 -
find_all_linear_names函数用以找到模型中所有的 linear 层 -
make_supervised_data_module函数整合LazySupervisedDataset和DataCollatorForSupervisedDataset两个类 -
maybe_zero_3函数 -
get_peft_state_maybe_zero_3函数 -
get_peft_state_non_lora_maybe_zero_3函数 -
SaverCallBack用以在训练结束时打印出 message 并保存模型参数继承自 TrainerCallack, 只有一个新定义方法 on_train_end. 先使用 get_peft_state_non_lora_maybe_zero_3 方法获取 non_lora_state_dict, 然后使用以下代码保存参数
1
torch.save(non_lora_state_dict, os.path.join(args.output_dir, 'non_lora_trainables.bin'))
-
setup_llava_model方法用以设定 LLaVA 训练时的相关参数, 如是否使用 lora, 是否冻结 backbone.- 若在
os.environ环境中没有设置LOCAL_RANK, 设置为默认序号的显卡, 并指定 cuda. - 设置好 compute_type 和 bits, 即计算精度和位宽
- 根据 vision_tower, 加载模型配置, 参数既可以为模型名称, 也可以为具体文件. 此处加载与 model_args.model_name_or_path 有关, 调用
LlavaLlamaForCausalLM类定义 model - vision_tower 决定调用 LlavaLlamaForCausalLM 类, 使用方法 LlavaLlamaForCausalLM.from_pretrained 加载 llava 的 backbone 和 head, , tune_mm_mlp_adapter 决定是否训练 mm_projector
- 根据 freeze_backbone, 设置 backbone, 也即前面得到的 model.model 没有梯度
- 设置 bits, 设置是否使用梯度累积, 设置是否使用 lora 微调
- 使用 transformers.AutoTokenizer.from_pretrained 自动分词
- 根据 model_args.version 设置不同的 pad_token 方法
- vison_tower 决定使用 model.get_vision_tower() 方法加载 vison_tower.
tune_mm_mlp_adapter参数决定了是否微调 变量 mm_projector, 代码如下
1
2
3
4if model_args.tune_mm_mlp_adapter:
model.requires_grad_(False)
for p in model.get_model().mm_projector.parameters():
p.requires_grad = True- 最后设置一些 args, 返回 model 和 tokenizer
- 若在
-
main函数为主函数- 使用 parser 聚合所有 arguments, 得到 script_args, model_args, data_args 三个设置变量
- 使用 setup_llava_model 建立模型, 得到 llava_policy 和 tokenizer. 然后 freeze reference model, 设置 llava_ref_model 内的参数没有梯度
- 使用 make_supervised_data_module 获取数据集
- 使用 TrainingArguments 初始化训练参数, 使用 LlavaDPOTrainer 初始化 DPO 训练器
- 使用
dpo_trainer.train()开始训练
llava_arch.py
BERT里的类似设置
- input_ids:经过 tokenizer 分词后的 subword 对应的下标列表
- attention_mask:在 self-attention 过程中, 这一块 mask 用于标记 subword 所处句子和 padding 的区别, 将 padding 部分填充为 0
- position_ids: 标记当前词所在句子的位置下标
- inputs_embeds: 如果提供了, 那就不需要 input_ids, 跨过 embedding lookup 过程直接作为 Embedding 进入 Encoder 计算
- hidden_states: decoder部分将执行 cross-attention 而不是 self-attention
- past_key_values:这个参数貌似是把预先计算好的K-V乘积传入,以降低 cross-attention 的开销(因为原本这部分是重复计算)
- use_cache: 将保存上一个参数并传回,加速 decoding
- output_attentions:是否返回中间每层的 attention 输出
- output_hidden_states:是否返回中间每层的输出
- return_dict:是否按键值对的形式(ModelOutput 类,也可以当作 tuple 用)返回输出,默认为真
修改代码 (dev)
train_dpo_post.py
训练参数
- 增加了
tune_lm_head, ‘tune_post_decoder’ 参数和相关的梯度调整 - 修改了
freeze_backbone,freeze_mm_mlp_adapter,tune_mm_mlp_adapter, 参数相关的梯度调整代码
保存参数
- (TODO) SaverCallBack: 改变 if 判断条件
base_dpo_trainer_post.py
(TODO) 修改 reference model 相关的代码
-
BasedDPOTrainer 类初始化函数中删除 is_peft_model 和 self.ref_model 定义的代码, 将使用 self.ref_model 的地方改为使用 policy_model 的输出 -
(TODO: check) policy_model 是ha_dpo/models/llava-v1_5/llava/model/language_model/llava_llama.py的LlavaLlamaForCausalLM实例, 该实例中有get_model函数, 使用该方法可以得到 reference model 的模型 (因为没有使用lora)
llava_llama.py (dev)
LlavaLlamaModel 类
LlavaLlamaModel 类定义了 llava 的 backbone, 继承自 LlavaMetaModel 和 LlamaModel, 父类是 ha_dpo/models/llava-v1_5/llava/model/llava_arch.py 定义的类.
LlavaLlamaForCausalLM 类继承自 LlamaForCausalLM 和 LlavaMetaForCausalLM, 该类的初始化与其父类 LlamaForCausalLM 相同, 父类是 transformers 库中 llama 的模块.
修改:
- [llava_arch_with_post_decoder.py √] 修改
encoder_images: 返回 vision_tower_features 和 image_features
llava_arch.py 的 LlavaMetaForCausalLM 类的 prepare_inputs_labels_for_multimodal 方法使用 encode_images 方法获得 image_features, 这里的 image_features 是 vision encoder 和 adapter 的输出.
- [llava_arch_with_post_decoder.py √]修改
prepare_inputs_labels_for_multimodal类: 添加返回值 vision_tower_image_features
prepare_inputs_labels_for_multimodal 在 llava_dpo_trainer.py 中被调用, 返回的 image_features 在后续代码 model.forward 传入 model
-
[llava_llama_post.py √] 修改
LlavaLlamaForCausalLM的forward函数- 添加传入参数
image_features: 传入的该参数可以输入进 post_decoder 中!!! - 添加
prepare_inputs_labels_for_multimodal函数的返回值image_features_with_inputs_embeds: 该函数在LlavaLlamaForCausalLM类和 trainer 文件中都用到了, trainer 中得到了input_embeds则不需再重复使用该函数 - 更新
image_features: 若input_embeds为空, 更新image_features为image_features_with_inputs_embeds - 添加
super.forward父类方法的参数image_features: 传入的该参数可以输入进 post_decoder 中!!!
- 添加传入参数
-
[llava_llama_post.py √] 参考
modeling_llama.py的LlamaForCausalLM创建新类, 作为新父类- 添加父类
LlamaForCausalLM的forward函数参数image_features: 传入的该参数可以输入进 post_decoder 中!!! - 添加 post_decoder 的代码: 在调用 self.model 后添加 post_decoder 模块
- 添加父类
-
[llava_dpo_trainer_post.py √] 添加
llava_dpo_trainer.py调用prepare_inputs_labels_for_multimodal时的参数, 添加model.forward代码的传入参数
增加文件夹 multimodal_post_decoder (dev)
文件夹内有 builder.py, configuration_post_decoder.py, ‘modelling_post_decoder.py’, ‘post_decoder.py’
没有 causal attention mask, 也没有 padding mask
没有用到, 借鉴 CLIP 的 builder.py
configuration_post_decoder.py
借鉴 CLIP 的 CLIPVisionConfig, CLIPTextConfig 和 CLIPConfig, 写出 PostDecoderBackboneConfig, PostDecoderVisionConfig, PostDecoderConfig
modeling_post_decoder.py
斗胆扒源码, 写一下 transformers 库 QAQ
TODO list:
-
- [ ] 记得找个女朋友
- llava_llama.py
-
- [ ] LlavaMetaModel.initialize_vision_modules 需要加上 Post Decoder 的初始化
-
- [ ] LlavaMetaModel 加上 get_post_decoder 方法
-
- llava_llama.py
-
- [ ] double check: LlavaLlamaForCausalLM 类在 forward 函数中调用 super().forward, 从而调用 transformers.modeling.llama 也即父类 LlamaForCausalLM 的 forward, 这里的 forward 调用了 LlamaModel 和 self.lm_head. 所以应该修改 LlavaLlamaForCausalLM 类的 forward 函数!
- 创建新类, 继承 modeling_llama.py 的 LlamaForCausalLM, 重写其 forward 函数; 改写 LlavaLlamaForCausalLM, 其父类改为前面创建的新类, 调用父类的 forward 创建 model
-
- modeling_llama.py -> 建议继承 modeling_llama.py, 在 modeling_post_decoder.py 中添加子类
-
- [√] LlamaForCausalLM 增加 get_post_decoder 方法
-
- train_dpo_post.py
-
- [√] 修改 from llava.model import *
-
- llava_arch_post.py
-
- [√] LlavaMetaForCausalLM 增加 get_post_decoder 方法
-
"
在Python中,super().forward()会调用父类的forward()函数,但它所使用的self是子类的实例。这意味着,当你在子类的forward()函数中使用super().forward()调用父类的方法时,父类的forward()函数中使用的self.model将引用子类中的model。
因此,如果子类和父类都定义了self.model,而在子类的forward()函数中调用了super().forward(),那么父类的forward()函数中使用的self.model将是子类中定义的model。"
post_decoder.py
密 QWQ
测试中的发现
SaverCallBack 保存参数过程
- 将 SaverCallBack 中的 on_train_end 方法 (经检测, **kwargs 继承了 TrainerCallback 的初始化参数)拿出来测试
1 | non_lora_state_dict = get_peft_state_non_lora_maybe_zero_3( |
得到结果
1 | non_lora_state_dict {'lm_head.weight': tensor([.....])} |
检测结果发现, non_lora_state_dict 保存了 lora 以外的被训练的参数. on_train_end 函数中会保存所有调整过的参数
-
llava_policy_model is not PeftModelForCausalLM, 这在 on_train_end 函数中可能有用
-
on_train_end 函数传入的参数中, args 即 TrainingArguments; state 是 TrainerState, 输出如下
1 | TrainerState(epoch=0.9936305732484076, global_step=39, max_steps=39, num_train_epochs=1, total_flos=0.0, log_history=[{'loss': 0.6931, 'learning_rate': 1e-06, 'rewards/chosen': 0.0, 'rewards/rejected': 0.0, 'rewards/accuracies': 0.0, 'rewards/margins': 0.0, 'policy_logps/rejected': -84.550048828125, 'policy_logps/chosen': -124.45401000976562, 'referece_logps/rejected': -84.550048828125, 'referece_logps/chosen': -124.45401000976562, 'logits/rejected': 0.51363205909729, 'logits/chosen': 0.37404561042785645, 'epoch': 0.03, 'step': 1}, ..., {'loss': 0.6725, 'learning_rate': 0.0, 'rewards/chosen': -0.0008349898271262646, 'rewards/rejected': -0.033970028162002563, 'rewards/accuracies': 0.8125, 'rewards/margins': 0.03313504159450531, 'policy_logps/rejected': -108.51647186279297, 'policy_logps/chosen': -132.4811248779297, 'referece_logps/rejected': -108.1767578125, 'referece_logps/chosen': -132.4727783203125, 'logits/rejected': 0.3725810647010803, 'logits/chosen': 0.2791193127632141, 'epoch': 0.99, 'step': 39}, {'train_runtime': 1678.4614, 'train_samples_per_second': 2.987, 'train_steps_per_second': 0.023, 'total_flos': 0.0, 'train_loss': 0.6816164560807056, 'epoch': 0.99, 'step': 39}], best_metric=None, best_model_checkpoint=None, is_local_process_zero=True, is_world_process_zero=True, is_hyper_param_search=False, trial_name=None, trial_params=None) |
control 是 TrainerControl, 输出如下
1 | TrainerControl(should_training_stop=True, should_epoch_stop=False, should_save=False, should_evaluate=False, should_log=False) |
kwargs 如下, 基本包括 model, tokenizer, optimizer, lr_scheduler, train_dataloader 和 eval_dataloader. model 是 LlavaLlamaForCausalLM 的 value, 包括 embed_tokens, layers, norm, vision_tower, mm_projector, lm_head
1 | Key: model, Value: LlavaLlamaForCausalLM( |
-
检查 on_train_end 的 if isinstance(kwargs[‘model’], PeftModelForCausalLM):
transformers 库内的 trainer.py 没有在 def _inner_training_loop 方法中 调用 on_train_end
模型结构代码
- 在 modeling_llama.py 源码中, LlamaForCausalLM 类的 forward 方法调用 self.model 前输出 self.model, self.model 包括了 vision_tower 和 mm_projector
1 | LlavaLlamaModel( |
- 在源码 modeling_llama.py 文件中的 LlamaForCausalLM 类 forward 方法中得到 self.model.get_vision_tower 的值如下
1 | <bound method LlavaMetaModel.get_vision_tower of LlavaLlamaModel( |
self.get_output_embeddings() 的值为 Embedding(32000, 4096, padding_idx=0), self.get_output_embeddings() 的值为 Linear(in_features=4096, out_features=32000, bias=False), self.model.vision_tower 为
1 | CLIPVisionTower( |
-
llava_arch_post.py的encode_images里可以获得 vision_tower 和 projector 的输出, 得到 vision_tower 输出 shape [, 576, 1024], image_features 输出 shape [, 576, 4096] -
测试时有关 input_ids = 1 的测试
1 | 测试时: |
可以发现, 当 past_key_values 存在时, 传入 input_ids 形状为 [1, 1], 这一部分操作来自 llava_llama.py 的 prepare_inputs_for_generation 函数
替换 bin 文件
若仅替换 head, 可以修改 ha_dpo/models/llava-v1_5/replace_head_bin.py 的 model_name_or_path 参数; 若要多阶段训练, 可以使用 ha_dpo/models/llava-v1_5/replace_head_bin.py, 需要指定 stage 和路径, 示例如下:
1 | python ha_dpo/models/llava-v1_5/replace_bin.py --tune_stage 1 \ |
| tune_stage | add_post_decoder | replace_head | replace_post_decoder |
|---|---|---|---|
| 0 (default) | True | True | True |
| 1 | True | False | True |
| 2 | False | True | True |
训练日志中的问题
-
Could not estimate the number of tokens of the input, floating-point operations will not be computed
huggingface 上的讨论
-
warnings.warn(
/home/cuiruochen/HA-DPO/ha_dpo/trainer/llava_dpo_trainer_origin.py:135: UserWarning: compute_loss is only implemented for DPODataCollatorWithPadding, and you passed a datacollator that is different than DPODataCollatorWithPadding - you might see unexpected behavior. Alternatively, you can implement your own prediction_step method if you are using a custom data collator -
[WARNING] [comm.py:152:init_deepspeed_backend] NCCL backend in DeepSpeed not yet implemented
TODO:
-
[WARNING] [stage3.py:1850:step] 1 pytorch allocator cache flushes since last step. this happens when there is high memory pressure and is detrimental to performance. if this is happening frequently consider adjusting settings to reduce memory consumption. If you are unable to make the cache flushes go away consider adding get_accelerator().empty_cache() calls in your training loop to ensure that all ranks flush their caches at the same time
-
[INFO] [logging.py:96:log_dist] [Rank 0] DeepSpeed info: version=0.9.5, git-hash=unknown, git-branch=unknown
-
/home/cuiruochen/anaconda/envs/hadpo/lib/python3.9/site-packages/torch/utils/checkpoint.py:31: UserWarning: None of the inputs have requires_grad=True. Gradients will be None
-
You should probably TRAIN this model on a down-stream task to be able to use it for predictions and inference.
-
aten/src/ATen/native/cuda/Indexing.cu:1146: indexSelectLargeIndex: block: [488,0,0], thread: [0,0,0] Assertion
srcIndex < srcSelectDimSizefailed. CSDN -
RuntimeError: CUDA error: device-side assert triggered
CUDA kernel errors might be asynchronously reported at some other API call, so the stacktrace below might be incorrect.
For debugging consider passing CUDA_LAUNCH_BLOCKING=1.
Compile withTORCH_USE_CUDA_DSAto enable device-side assertions. -
…/aten/src/ATen/native/cuda/Indexing.cu…/aten/src/ATen/native/cuda/Indexing.cu:1146:1146: indexSelectLargeIndex: indexSelectLargeIndex: block: [464: block: [492,0,0,0,0], thread: [84], thread: [108,0,0,0,0] Assertion
srcIndex < srcSelectDimSize] AssertionsrcIndex < srcSelectDimSizefailed.failed. -
RuntimeError: CUDA error: device-side assert triggered
CUDA kernel errors might be asynchronously reported at some other API call, so the stacktrace below might be incorrect.
For debugging consider passing CUDA_LAUNCH_BLOCKING=1. -
Setting OMP_NUM_THREADS environment variable for each process to be 1 in default, to avoid your system being overloaded, please further tune the variable for optimal performance in your application as needed.
-
calling `cublasGemmStridedBatchedExFix( handle, opa, opb, m, n, k, (void*)(&falpha), a, CUDA_R_16F, lda, stridea, b, CUDA_R_16F, ldb, strideb, (void*)(&fbeta), c, CUDA_R_16F, ldc, stridec, num_batches, CUDA_R_32F, CUBLAS_GEMM_DEFAULT_TENSOR_OP)
测试 Evaluation
根据 HA-DPO 给出教程, 进行 Evaluation
POPE Evaluation
step 1. 输入以下指令,
1 | torchrun --nproc_per_node 1 --master_port $RANDOM ha_dpo/models/llava-v1_5/pope_eval.py \ |
--set: validation sets in POPE, chooserandom/popular/adv. After inference, the answer file will be generated under the folder of LLaVA.--model-path: path to the the trained adapter weights.--model-base: 使用LLaVA-baseline时, 不设置此项, 同时设置--model-path为liuhaotian/llava-v1.5-7b--nproc_per_node: 代表使用几张卡. 详见博客
在服务器上我使用的指令为:
1 | torchrun --nproc_per_node 8 --master_port $RANDOM ha_dpo/models/llava-v1_5/pope_eval.py \ |
若替换了训练后的参数, 可以使用以下命令:
1 | torchrun --nproc_per_node 4 --master_port $RANDOM ha_dpo/models/llava-v1_5/pope_eval_post.py \ |
note: 在 LLaVA 给出的 python==3.10 环境中, 在 torchrun 过程中会报错, 应该是模型名称均为 ‘llava’ 导致的
单机多卡
-
可以使用
CUDA_VISIBLE_DEVICES指定使用哪几张显卡. 不使用该指令同时指定nproc_per_node大于1, 会默认使用序号为 0 到 nproc_per_node-1 的显卡 -
(官方推荐, 可拓展到多机多卡) 在命令指定的
pope_eval.py文件中可以修改来指定使用哪几张显卡. 值得注意的是, 分布式运行指令torch.distributed.launch已经被遗弃, 现在都使用torchrun, 详情见官方文档. “Note that --use-env is set by default in torchrun. If your script expects--local-rankargument to be set, please change it to read fromos.environ['LOCAL_RANK']instead. See https://pytorch.org/docs/stable/distributed.html#launch-utility for further instructions”.
使用1.的代码如下
1 | CUDA_VISIBLE_DEVICES=3,4,5,6 torchrun --nproc_per_node 4 --master_port $RANDOM ha_dpo/models/llava-v1_5/pope_eval.py \ |
step2. 修改answer和label的路径
将 ha_dpo/data/POPE/evaluate.py 中的 ans_file 设置为第一问中产生回答文件的地址, 一般为 ha_dpo/models/llava-v1_5 路径下的某个jsonl文件. label_file 设置为 ha_dpo/data/POPE/output/coco 下的文件
step 3. 进行测试
运行以下代码获取POPE结果
1 | python ha_dpo/data/POPE/evaluate.py |
使用 8 卡 3090, 仅训练 head, 自定义 ref_model, 得到结果:
| Model | method | HA-DPO | train | lr | epoch | Accuracy | Precision | Recall | F1 Score | Yes Ratio (%) |
|---|---|---|---|---|---|---|---|---|---|---|
| LLaVA-1.5-7B | popular | × | - | - | 86.23 | 83.28 | 90.67 | 86.82 | 54.43 | |
| LLaVA-1.5-7B | popular | √ | head | 2e-6 | 87.03 | 85.45 | 89.27 | 87.32 | 52.23 | |
| LLaVA-1.5-7B | random | × | - | - | 89.67 | 88.89 | 90.67 | 89.77 | 51.00 | |
| LLaVA-1.5-7B | random | √ | head | 2e-6 | 90.10 | 90.78 | 89.27 | 90.02 | 49.17 | |
| LLaVA-1.5-7B | adversarial | × | - | 79.73 | 74.40 | 90.67 | 81.73 | 60.93 | ||
| LLaVA-1.5-7B | adversarial | √ | head | 2e-6 | 80.80 | 76.34 | 89.27 | 82.30 | 58.47 |
使用 4 卡 3090, 训练 post decoder:
| Model | method | HA-DPO | train | lr | epoch | Accuracy | Precision | Recall | F1 Score | Yes Ratio (%) |
|---|---|---|---|---|---|---|---|---|---|---|
| LLaVA-1.5-7B | popular | × | - | - | 86.23 | 83.28 | 90.67 | 86.82 | 54.43 | |
| LLaVA-1.5-7B | popular | √ | post decoder | 2e-6 | 1 | 84.00 | 97.31 | 69.93 | 81.38 | 35.93 |
| LLaVA-1.5-7B | popular | √ | post decoder | 5e-7 | 1 | 87.20 | 85.86 | 89.07 | 87.43 | 51.87 |
| LLaVA-1.5-7B | random | × | - | - | 89.67 | 88.89 | 90.67 | 89.77 | 51.00 | |
| LLaVA-1.5-7B | random | √ | post decoder | 2e-6 | 1 | |||||
| LLaVA-1.5-7B | adversarial | × | - | 79.73 | 74.40 | 90.67 | 81.73 | 60.93 | ||
| LLaVA-1.5-7B | adversarial | √ | post decoder | 2e-6 | 1 |
TODO
-
- [ ] 记得找个女朋友 QWQ
- 了解代码结构
-
- [] - deepspeed 的 mm_use_im_start_end, mm_use_im_patch_token, lazy_preprocess 参数意义?
-
- [] prepare_inputs_labels_for_multimodal 在 hadpo 没有做出特殊的处理?
-
- 修改代码结构
-
- [] SaverCallBack 保存条件修改
-
- [] reference model 不放在显存上
-
- [] LlavaMetaModel.initialize_vision_modules 需要加上 Post Decoder 的初始化
-
- 将 hadpo 的路径改为 post decoder
- ZeRO_offload 为什么会报错?
- 后续将 playground 数据集剪切过来
-
- [ ] 学习使用 wandb, 删除不成功的训练日志, 灵活改变保存条件
-
- [ ] 查看 LLaVA 的原生 MODEL_ZOO
maybe useful
几个问题
-
flash-attn 和 xformers
flash-attn 适合 A100 服务器使用, xformers 适合 RTX4090 使用? 需要寻找资料
-
ZeRO2, ZeRO3, ZeRo_offload
时间换空间的策略. ZeRO-1是将优化器分片, ZeRO-2是在ZeRO-1的基础上将梯度分片, ZeRO-3是在ZeRO-2的基础上将权重分配训练. 速度 1>2>3>offload. 为什么 ZeRO_offload 会报错?
-
服务器问题
时间不准, 服务器没有
tree环境指令 -
以下 Warning 未解决
1
[WARNING] [comm.py:152:init_deepspeed_backend] NCCL backend in DeepSpeed not yet implemented
-
模型量化策略 quantization strategies
模型量化 (Quantization) 是一种用于通过修改权重的精度来减小大型神经网络 (包括大型语言模型) 大小的技术, 尝试从 16-bit 变为 4-bit/8-bit training. official implement
根据 LLaVA official scripts, 使用 4-bits 进行 inference 的指令为:
1
python -m llava.serve.model_worker --host 0.0.0.0 --controller http://localhost:10000 --port 40000 --worker http://localhost:40000 --model-path /home/cuiruochen/model/llava-v1.5-7b
-
估计模型参数, 博客
dtype 每10亿参数 (1B) 需要占用显存 float32 4G fp16 / bf16 2G int8 1G int4 0.5G -
PEFT 的使用
.get_base_model(), 用于从 PEFT 实例中得到具体的模型, 实例中包括了优化器, 微调策略等等
1
2
3
4
5from peft import PEFTModel
# 实例化 PEFT 模型对象
peft_model = PEFTModel()
# 获取基础模型
base_model = peft_model.get_base_model() -
Tensor Parallel
对于 , 和 的形状分别为 和 , 有两种切分方式进行分块计算:
- 沿着第二维切分为 份, 每一份的形状为 (b ,c_{\text{\split}}), 每一份放在一个 GPU 上与 相乘, 得到 个 , 最后将各个 GPU 上的结果按照第二维进行顺序拼接 (all_gather 通信操作), 得到最终结果
-
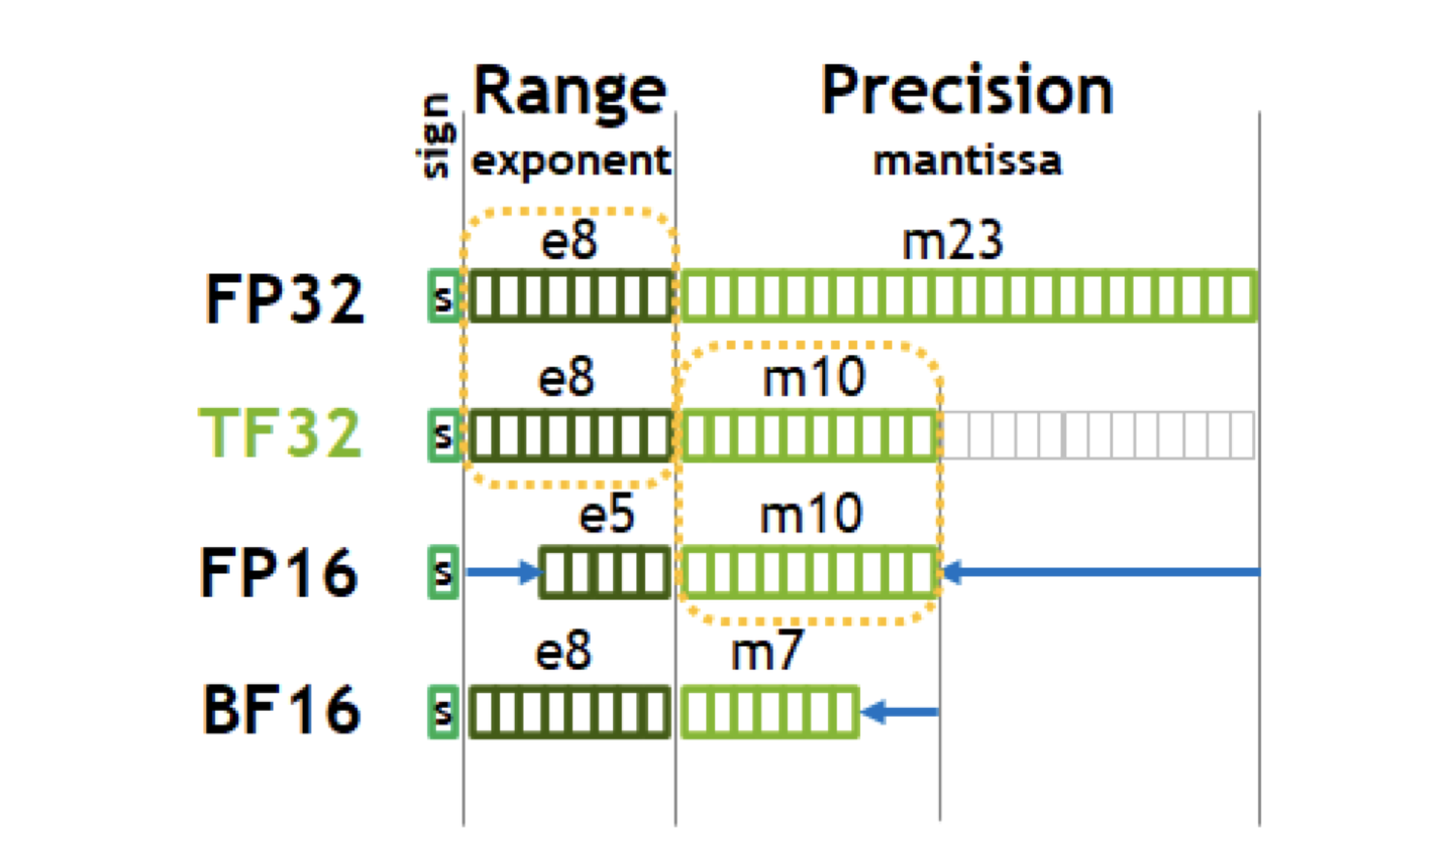
数据精度
- FP32: 4 bytes (32 bits), 也即数据类型 float
- 符号位 S, 1 bits
- 指数偏移值 E, 8 bits (幂值)
- 分数值 M, 23 bits, 表示浮点数的数值大小
- 浮点数的值 $ (-1)^{\text{s}} \times \text{M} \text 2^{\text{k}} $
- TF32: A100 中 TF32 的峰值计算速度是 FP32 的 8 倍
- 深度学习中对浮点数的表示范围看中, 有效数字没有那么重要
- TF32 将 FP32 中23个分数值截短为 10bits, 指数位不变, 总长度为 19=1+8+10, 这里保留 10bits是因为 FP16 只有 10 bits 表示分数值
- BF16: Google 在 TensorFlow 中引入的数据类型, 可以认为是将 FP32 的前16位截取获得的
- 符号位 S, 指数偏移位 E, 分数值 M, FP32-1-8-32, TF32-1-8-10, FP16-1-5-10, BF1-8-7
- FP32: 4 bytes (32 bits), 也即数据类型 float